|
FEATURES & BENEFITS:
•No Running Costs,
•No Fuel or Electricity Needed,
•Self-powered S No Pollution,
•Operates 24 hours a day all year,
•Simple Maintenance & Basic Installation
•Very reliable and durable
•Five Models available
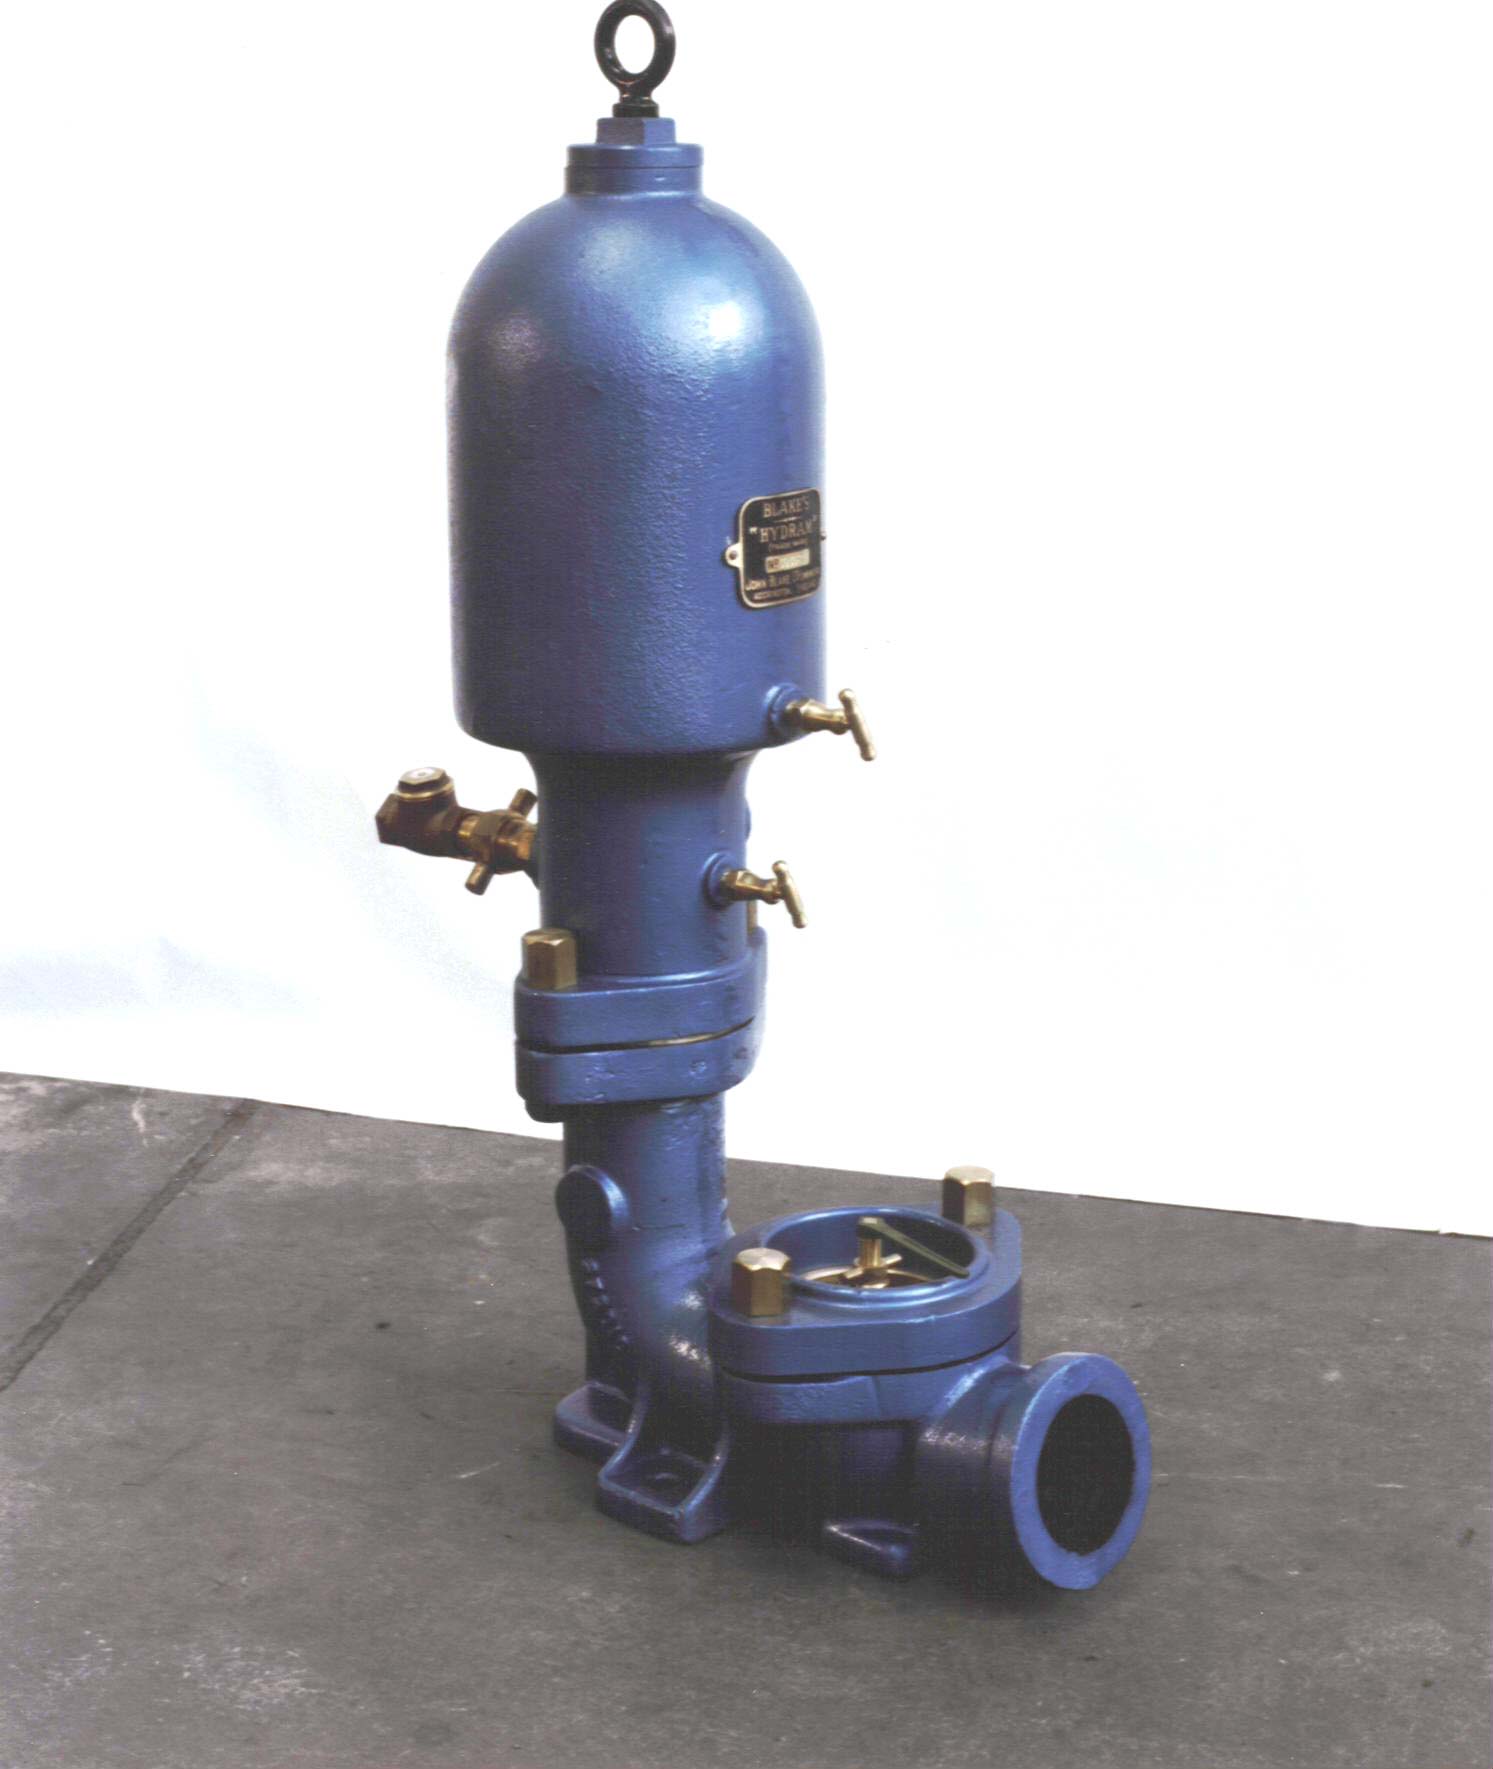
•John Blake design
•Prices from KES 150,000
•24 months warranty
•All that you require is a flowing stream/river with a minimum waterfall of 5 feet
INTRODUCTION TO HYDRAM PUMPS
Rams are devices for pumping water solely by means of water-power. The flow and fall of the water powers the hydram pump, driving a portion of this water uphill. This provides
a continuous supply of water day after day, year after year, without interruption in service. Given a steady supply of water, a Ram is the closest thing to a perpetual motion
machine. Since the device does not require electricity, there are no operating costs, making the Ram system a highly cost efficient one. In addition, Rams are self-starting and
require no lubrication or priming.
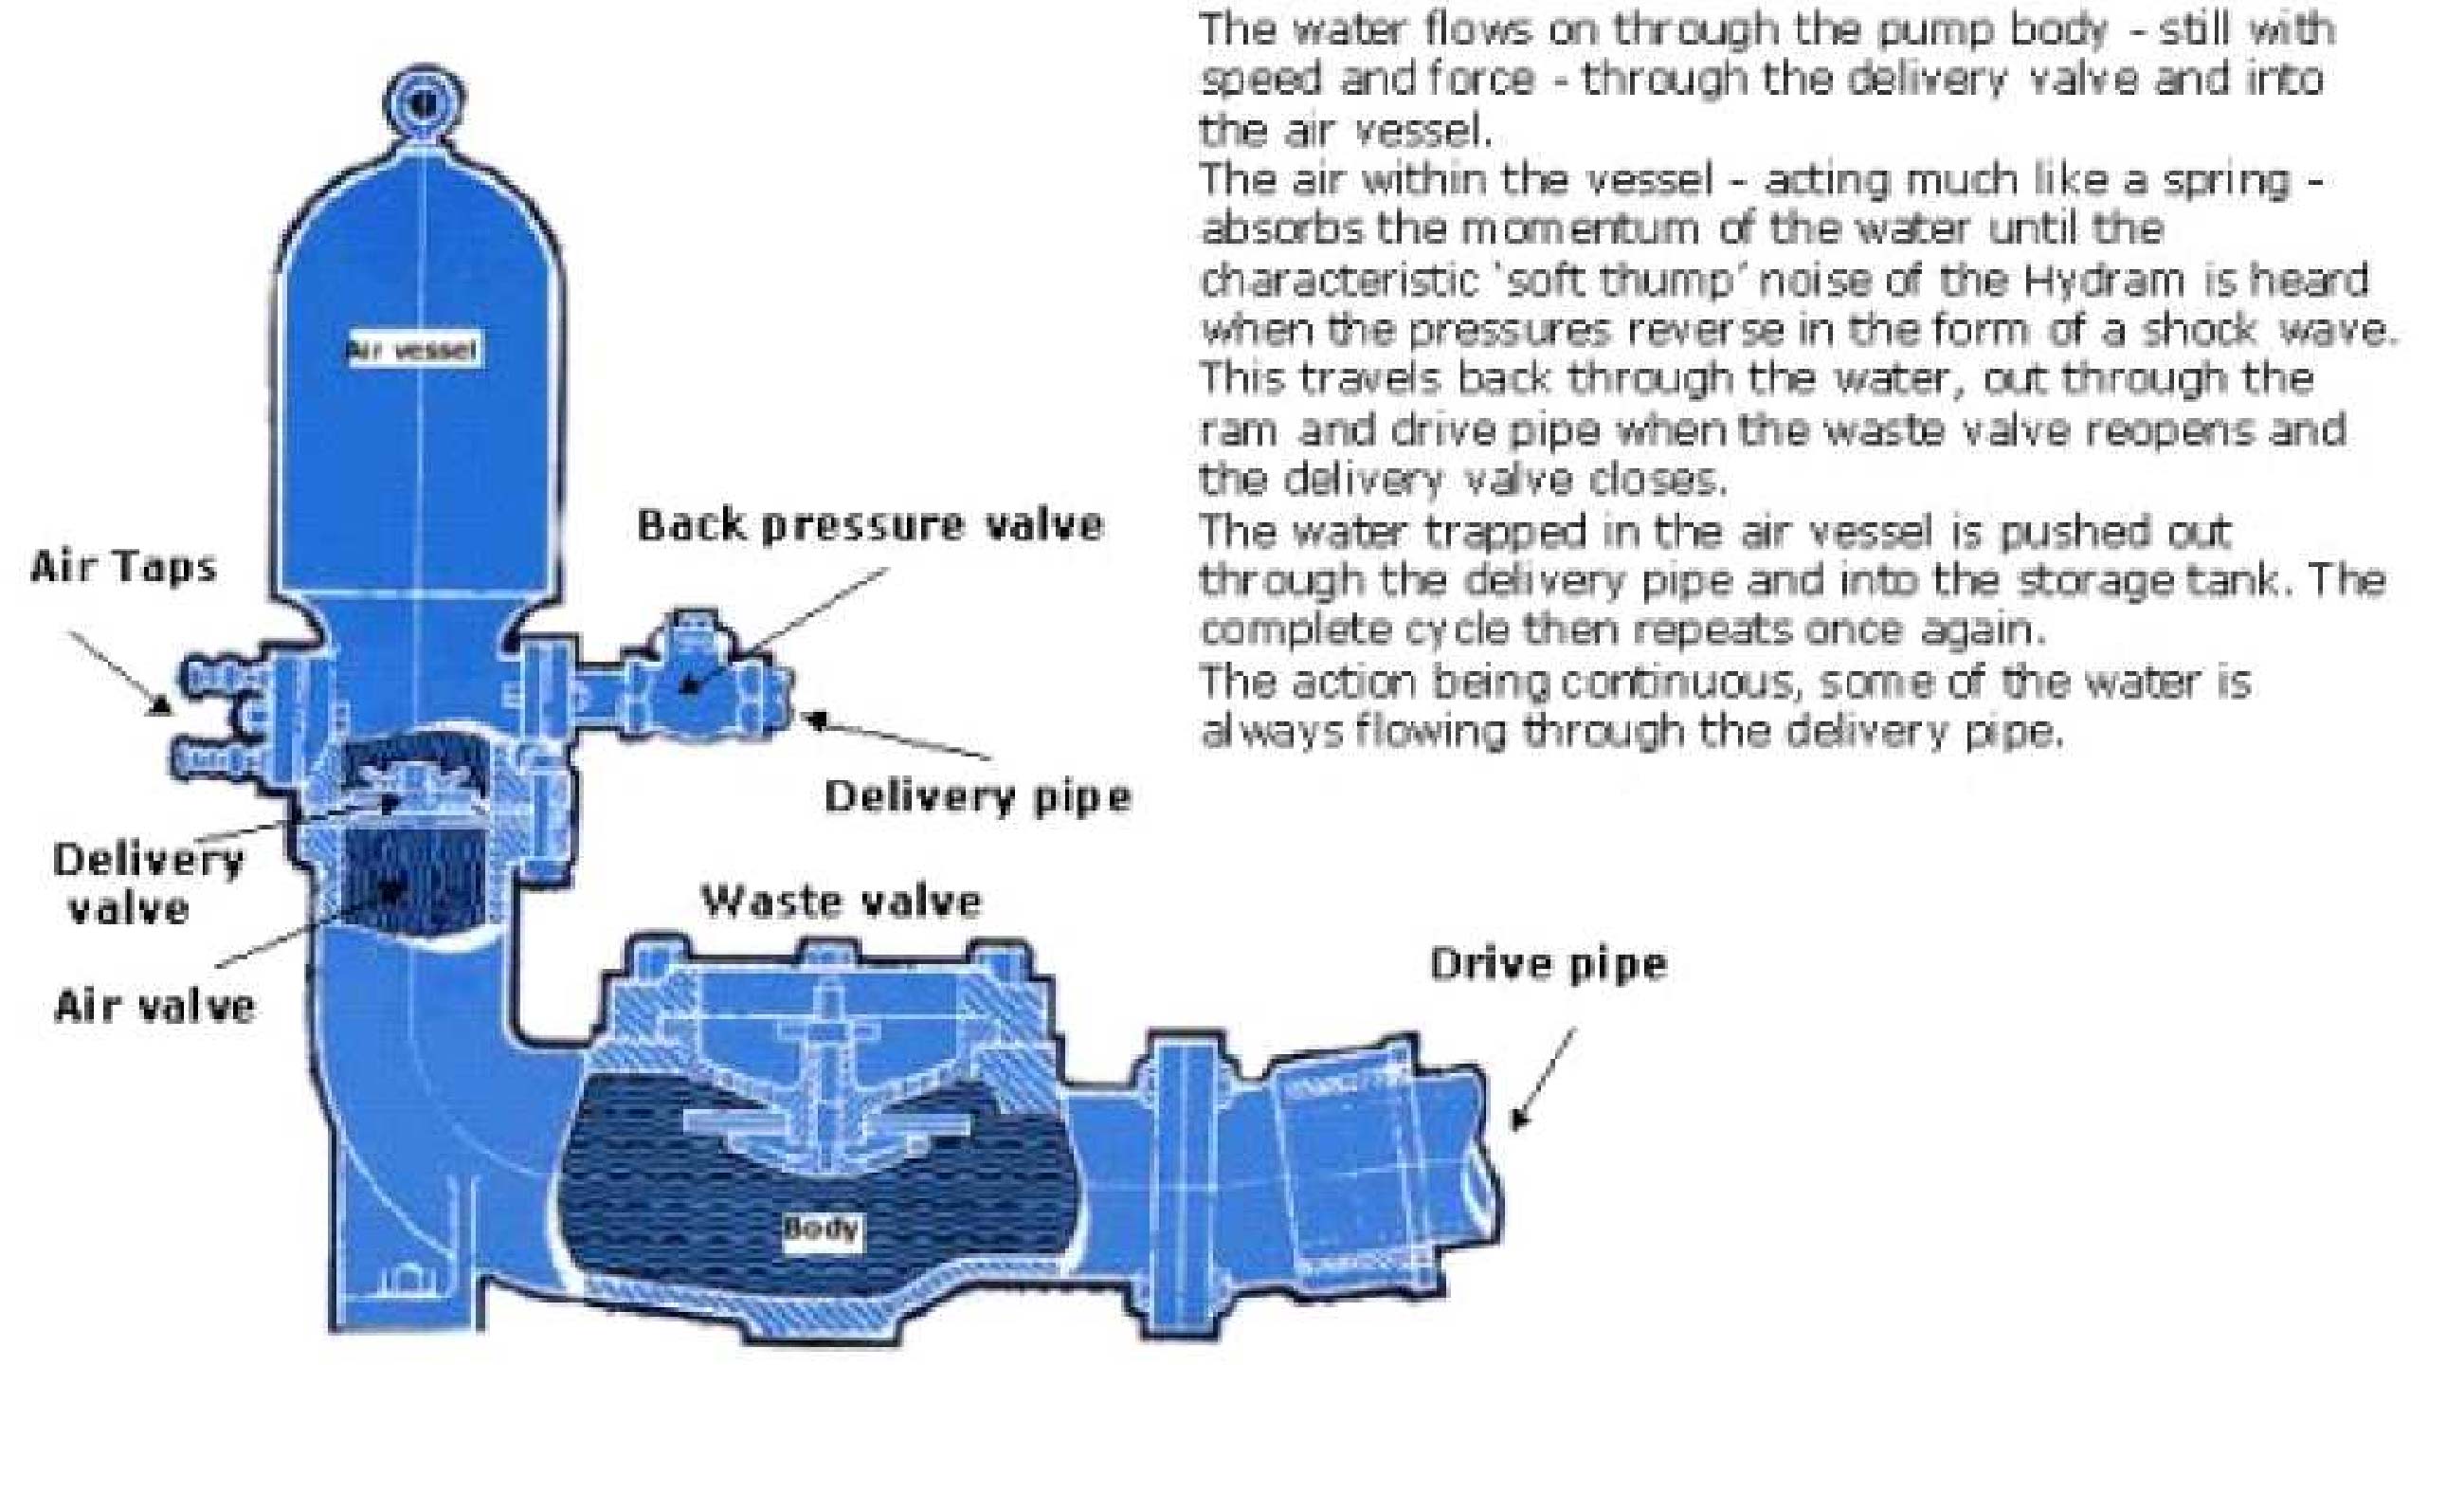
HYDRAM PUMP WORKING PRINCIPLE
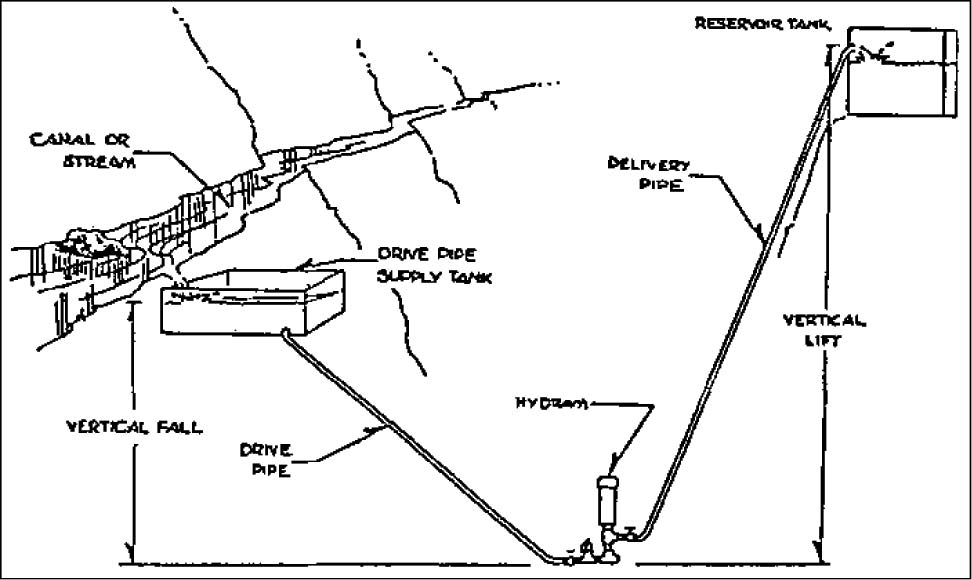
INSTALLATION REQUIREMENTS
In order for a hydram pump to work, you require two things, a steady source of running water (drive water) and a working fall. The minimum drive water required is 7 litres a minute, the minimum working fall is 1 meter. If you have both of these, or greater then you have the potential of installing a Hydram.
For each installation, the following information is necessary:
• The Flow of water at the source of Supply (in gallons per minute).
• The vertical Fall (in feet) from the source of Supply to the planned location of the Ram.
• The vertical Elevation above the Ram to which the water is to be pumped.
• The distance between the point of Supply and the Ram location, as well the pipe line distance over which the water is to be delivered.
• The number of gallons required per day. Flow of Supply Water Available In Gallons Per Minute Time the Flow from the Supply in gallons per minute as accurately as possible. Do
not guess this-be sure to measure it. If the supply is low, run the water into a bucket or tub of known capacity. This measurement should be taken during the driest season of
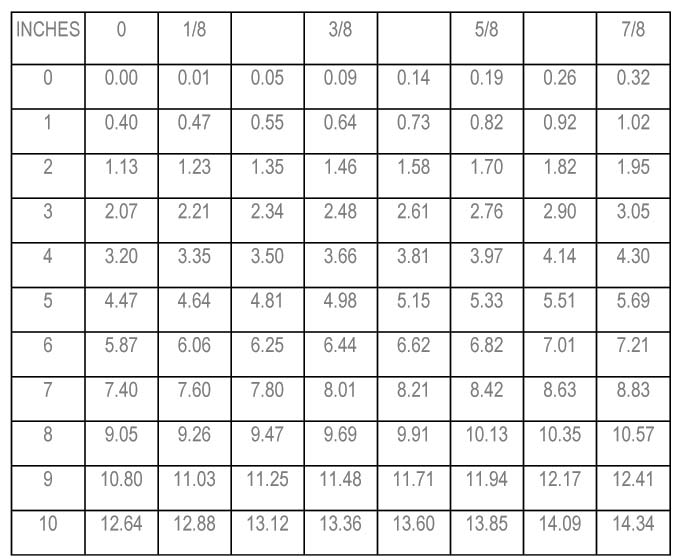
the year. See Figure 3. If the water flow is large and it is not practical to measure Flow with a bucket of tub, use a "Weir" (notch in a board). Measure the width of the notch
W and the height of the water in the notch H. The height should be measured on a level 2 feet Upstream from the notch as in Figure 4.
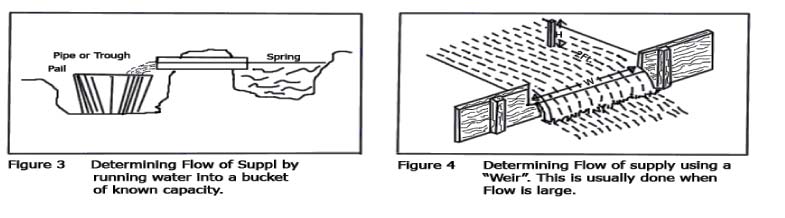
Fig 3 Determining flow of supply by running water into a bucket of known capacity.
Fig 4 Determine flow of supply using a "weir." This usually is done when flow is large.
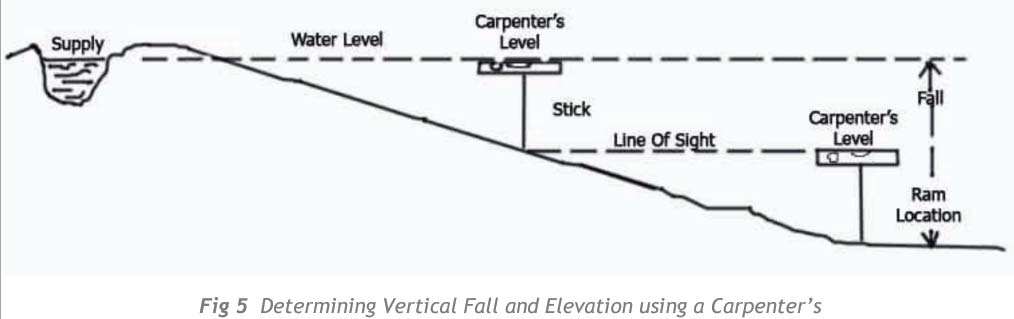
This table gives the number of cubic feet of water that will pass over a weir 1 inch wide and from 1/8 to 10 7/8 inches in depth. The figures in the first upright column represent whole inches and those in the top horizontal line represent fractional parts of an inch of depth over the weir. The figures in the second upright column indicate the number of cubic feet or water that will flow per minute over the weir for whole inches in depth, and in succeeding columns, whole inches and fractions under which they occur.
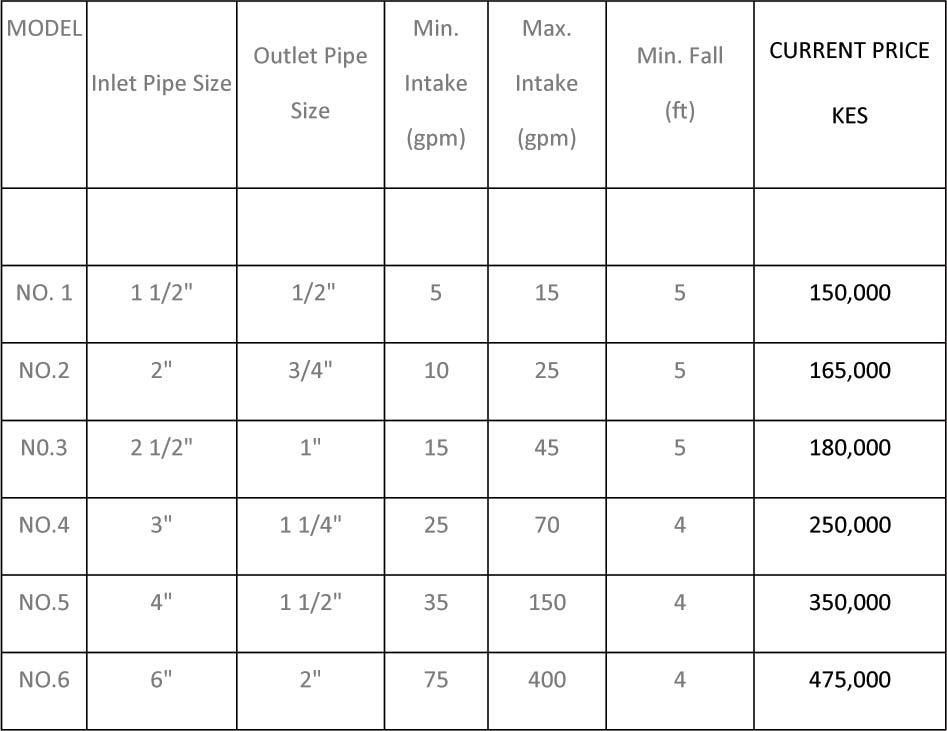
Then the number of cubic feet thus found, multiplied the width of the weir in inches, will give the capacity of the stream. Example: to find the required number of cubic feet of water that will flow over a weir 4 inches in depth and 30 inches in width, follow down the left hand column of figures in table to four, then across until directly under the in the top line, to 4.14; this, multiplied by 30 (width of the notch in the weir) will give 124, the number of cubic feet of water that passes over the weir per minute. To reduce to gallons per minute, multiply by 7 to get 930 gallons per minute. Determining The Vertical Fall The difference in vertical elevation between the level of the water at the source and the planned location of the Ram is known as the Fall. This can be easily and quickly measured by using an ordinary carpenter’s level on a stick. Start at the planned location of the Ram and go upwards, as shown in the following illustration. Bear in mind that, all other conditions being the same, the more Fall available, the more water the Ram will pump. For example, the Ram will pump twice as much water with a Fall of 8 feet as it would with a Fall of 4 feet. Therefore, it is advisable to take advantage of as much Fall as possible. In most cases, merely locating the Ram further downstream will provide more Fall. Vertical Elevation The vertical Elevation is the height to which the water will be pumped above the Ram location. It too can be easily determined by using an ordinary carpenter’s level on a stick as illustrated in Figure 5. Start measurements at the planned location of the Ram and work upward to the highest point at which water will be delivered.
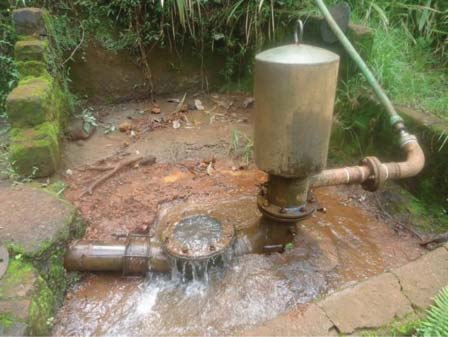
Installation of Rams
The Drive Pipe should be metal, (usually galvanized steel), unless encased in concrete. In some cases people have successfully used well-anchored PVC plastic pipes. However, for trouble-free operation we recommend that the Drive Pipe be galvanized steel. It should be straight as possible without elbows, and normally the same pipe size as Intake end of the Ram. It should be watertight and rigidly anchored, with a Strainer at the source end to keep out refuse from the Ram.
Foundation and Ram Pit A concrete slab or a large flat rock provides a good solid foundation on which to set the Ram. The best procedure is to put in a concrete slab as a foundation, slightly sloping towards the rear where the unused water will be carried away. After the Drive Pipe and Delivery Pipe are installed and the Ram is in operation, the Ram should be enclosed in a Concrete Pit. The Ram Pit should be large enough to give a clearance of 18 inches from the Ram on all sides in cases any bolts need to be replaced.
The Pit should be high enough to prevent flood water from getting in. A sloping shed roof of boards provides good cover, yet, in colder climates it is better to cover the Pit with a concrete slab to prevent freezing. Use a manhole or a metal cistern for an opening to the Ram Pit. Delivery Pipe The correct size Delivery Pipe should match the dimension given for each particular size of Ram. Do not install a Delivery Pipe smaller than that is specified. By doing so you increase the amount of friction lost, consequently reducing the amount of water delivered. Avoid right-angled elbows wherever possible. This will minimize friction loss. Do not fill the ditch until the Ram is started and in operation. That way, leaks can be easily located and stopped before water covers the Delivery Pipe. The installation of a Gate Valve in the Delivery Pipe at the Ram is a great convenience for cutting off water when it is necessary to adjust or too repair a Ram.
Calculation of pumped water
Once you know the Flow, Fall, Vertical Elevation, and distances to and from the Ram, you are ready to calculate the amount of water (D) the Ram will deliver to you. Multiply the available Flow in gallons per minute (V) by the Vertical Fall in feet (F). Divide that by the vertical Elevation (E). Multiply the result by 0.6 (60%), the normal efficiency of a Ram installation:
D= V x F/E x 0.6
This will give you the Delivery (D) in gallons per minute using all the available water supply. To obtain gallons per hour, multiply this amount by 60. For gallons per day, multiply by 1440.
Water delivered
PERFORMANCE CHART FOR POWERLESS HYDRAULIC RAMS SHOWING PERCENTAGE OF WATER USED THAT A POWERLESS RAM WILL DELIVER UNDER VARIOUS CONDITIONS OF VERTICAL FALL AND ELEVATION.

PRICES
2016 PRICE CATALOGUE FOR HYDRAM PUMPS
|